Wednesday, July 23, 2008
Saturday, July 19, 2008
Whitetrash tubeless
I am really lucky to have lots of friends that work in some way, shape or form in the bike industry. I get to see alot of the technology, and new ideas that are really fresh and some that are rehashed. I really think that tubeless tires with sealant are a great idea, and have the potential to really replace replace the inner tube. There is a reason that we no longer use tubes in car tires.
Make no mistake if I had more disposable income I would use Stans ZTR Rims
but that ain't the case so I will just make due and amuse myself.
 So as a result I have tinkered with various different forms of ghetto tubeless (GTL) as it is refered to on MTBR.com, but I have found that this method does not work well with certain, more narrow rims, like Bontrager rims. This is because the the thick rubber ring that surrounds the valve stem interferes with the tire/rim interface causing the tire to blow off the rim and a temporary loss of hearing.
At left you cans see an example of a great rim for ghetto tubeless as defined in the link above.
As a result I have cooked up my own variation of this method of tubeless that is a combination of the stans yellow tape method. and GTL that eliminates using the valve stem existing on the inner tube. So heres how it goes.

You need to split a inner tube that is a size smaller (if you have a 29er you can use a 26 or 24 in tube) starting at the valve stem and following the lines, splitting the tube on the INSIDE and cutting out the valve stem.
 Now you have a wide flat loop of rubber, so to ease inflation you are now gonna cut a narrow rimstrip loop from your wide flat loop following the existing lines on the tube. Now take your narrow rubber rim strip and stretch it over the rim keeping it flat. It should just cover the bottom of the rim, and not touch the side walls of the rim. Then snip a tiny slit in this rim strip for the valve stem to go through later.
 Now take a Stans UST valve stem (or one with a removable valve core) and press it through the two rubber rim strips and thread on the nut as tightly as possible, and mount your tire over top of the rim strips.

Now, you are gonna make a test inflation to make sure that you have a good tight fit before you add sealant. Some folks like to spray soapy water on the tire bead so that it seats more easily, but I have not found this to be necessary on tires less than 2.2 inches. If you use a large diameter tire, like a rampage or Nevegal, soapy water is very helpful.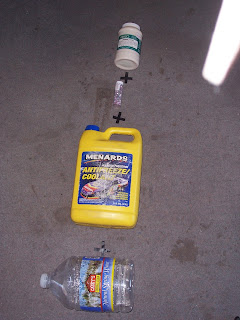 Here is the recipe:Edit
Since posting this I have found this recipe to be wholey inadequate for sealing punctures. The glitter was a dumb idea as it just sticks to the rubeer casing and does not move very freely inside the tire. I have been using with good success 1 part slime and 1 part latex mold builder cut with 50/50 antifreeze/water (it was what i had)
There is lots of discussion about the safety and reliability of various types of tubeless systems but I have found this to be reliable, cheap, and adequate system.
There alot of techniques for setting up your tires tubeless, and I would encourage folks that want to give it a try to check out the stans website, MTBR.com, youtube, or just google it.
I have used GTL on salsa Delgado cross rims and with IRC Mythos 35c slicks for the dirty kanza 200, but had to keep high tire pressure (over 55psi) to maintain a solid seal. On MTB GTL I have run pressure down as low as 15 psi without any burping. It think that the longer a tire is setup GTL the more resistent it is to air loss or burping.
Let me know if you have any tips or other suggestions, or other experiences if you give this a whirl.
Make no mistake if I had more disposable income I would use Stans ZTR Rims
but that ain't the case so I will just make due and amuse myself.
 So as a result I have tinkered with various different forms of ghetto tubeless (GTL) as it is refered to on MTBR.com, but I have found that this method does not work well with certain, more narrow rims, like Bontrager rims. This is because the the thick rubber ring that surrounds the valve stem interferes with the tire/rim interface causing the tire to blow off the rim and a temporary loss of hearing.
At left you cans see an example of a great rim for ghetto tubeless as defined in the link above.
As a result I have cooked up my own variation of this method of tubeless that is a combination of the stans yellow tape method. and GTL that eliminates using the valve stem existing on the inner tube. So heres how it goes.

You need to split a inner tube that is a size smaller (if you have a 29er you can use a 26 or 24 in tube) starting at the valve stem and following the lines, splitting the tube on the INSIDE and cutting out the valve stem.
 Now you have a wide flat loop of rubber, so to ease inflation you are now gonna cut a narrow rimstrip loop from your wide flat loop following the existing lines on the tube. Now take your narrow rubber rim strip and stretch it over the rim keeping it flat. It should just cover the bottom of the rim, and not touch the side walls of the rim. Then snip a tiny slit in this rim strip for the valve stem to go through later.
- Now stretch your wide flat loop of rubber over the rim so that the excess rubber hangs over the edges of the rim. Locate the valve hole in the rim and make a tiny snip in the wide flat loop directly over top of the valve hole.
 Now take a Stans UST valve stem (or one with a removable valve core) and press it through the two rubber rim strips and thread on the nut as tightly as possible, and mount your tire over top of the rim strips.
Now, you are gonna make a test inflation to make sure that you have a good tight fit before you add sealant. Some folks like to spray soapy water on the tire bead so that it seats more easily, but I have not found this to be necessary on tires less than 2.2 inches. If you use a large diameter tire, like a rampage or Nevegal, soapy water is very helpful.
- I used to rely on compressed air, but have found that if you can't seal it up with a hand pump you will probably need to build up the rim strip some more. Josh Patterson has a great idea on how to do this without adding too much rotational weight using strapping tape. (Some folks will contest that using two rubber rim strips is excessively heavy, but I am not concerned with weight with this method, solely on having a cheap safe reliable puncture resistant system. Plus you gonna throw away the excess inner tube rubber anyway)
- But I digress, hook your floor pump and pump like mad for about 10 seconds to seat the bead. Quickly inspect the tire to make sure that you are seating the bead evenly, if its ok I like to run the pressure up to 40 psi just to make sure that the bead/rim interface is sufficient, and leave it inflated while I prepare the sealant.
- Sealant.........this is a sorted topic. Up till now I have been quite pleased with using Stans Sealant, which is kinda pricey but works really well. But I have been trying my hand at making my own sealant based on a latex base.
 Here is the recipe:Edit
Since posting this I have found this recipe to be wholey inadequate for sealing punctures. The glitter was a dumb idea as it just sticks to the rubeer casing and does not move very freely inside the tire. I have been using with good success 1 part slime and 1 part latex mold builder cut with 50/50 antifreeze/water (it was what i had)
- Latex mold builder (2 parts)
- Ethylene Glycol anti-freeze (1 part)
- Water (2 parts)
- an aggregate. Stans uses finely ground rubber but I have tried using pink/opaque med size glitter in this batch. You could also try silicate beads.
There is lots of discussion about the safety and reliability of various types of tubeless systems but I have found this to be reliable, cheap, and adequate system.
There alot of techniques for setting up your tires tubeless, and I would encourage folks that want to give it a try to check out the stans website, MTBR.com, youtube, or just google it.
I have used GTL on salsa Delgado cross rims and with IRC Mythos 35c slicks for the dirty kanza 200, but had to keep high tire pressure (over 55psi) to maintain a solid seal. On MTB GTL I have run pressure down as low as 15 psi without any burping. It think that the longer a tire is setup GTL the more resistent it is to air loss or burping.
Let me know if you have any tips or other suggestions, or other experiences if you give this a whirl.
Wednesday, July 16, 2008

Saturday, July 12, 2008
 Its not duct tape but its the next best thing if you have a wedge type eccentric bottom bracket that is so prevelant on gary fisher rigs and ferrous Mtb's.
Big Als rig has been making the most horrible squeaking and knocking noise whenever you would be out of the saddle grinding up a big climb. I tried taking it out and greasing it, cleaning it and then greasing the poo out of it again.
And it still squeaked.
I even thought it might have been the BB itself, and took that apart and played with it.
Then I started searching MTBR.com. Now I take everyhting that is on MTBR with a grain of salt cuz there are alot of people that post on there just to read their own writing. But often I find some really good ideas and this was one of them.
- First take your seat post out and ride you bike up a hill. this just is a precaution to make sure that it is actually your EBB and not your seat or post that doin the whining.
- Next pull out the EBB, wipe it down really well and look at the wedge. you should see primary wear spots on the wedge if it has been squeaking long. this is probably where the the sound is eminating from. especially if you do not see any wear spots on the anodized surface of the BB.
- Solution is to put two wraps of teflon plumbers tape over the wear spots on the wedge and one wrap around the rest of the EBB. then gently slide the EBB back into the clean EBB shell ( it will fit a little more snuggly) Now put your cranks back on, tension the chain, apply torque to the set screww in you EBB and go ride.

It should also be noted that This was not my idea, nor did I take the pictures. But I do not like listing MTBR user names to give credit cuz I have no way of knowing if it is a original idea. I find this incredibly annoying. But this is a new facet of the age of inforamtion and livin in a wikipedia world. Hope that this helps somebody.

Subscribe to:
Posts (Atom)
